graph TD
    A[1. Data Collection] --> B[2. Data Preprocessing]
    B --> C[3. EDA]
    C --> D[4. Feature Selection]
    D --> E[5. Train-Test Split]
    E --> F[6. Model Training]
    F --> G[7. Model Evaluation]
    G --> H[8. Model Tuning]
    H --> I[9. Deployment]

    %% Position nodes in an arc-like manner
    A --> |" /////" | I
    B --> |" /////" | H
    C --> |" /////" | G
    D --> |" /////" | F
    E --> |" /////" | E

    %% Styling
    classDef arcFill fill:#ff,stroke:#333,stroke-width:2px;
    class A,B,C,D,E,F,G,H,I arcFill;
End-to-End Machine Learning Project
Introduction to Machine Learning
Set-up ML environment
In this project we used specific versions of the libraries. Save the following libraries in a text file- requirements.txt. Install all these libraries using the code python -r pip install requirements.txt.
End-to-End Machine Learning Project: Classifying the Iris Dataset
In this project, we will walk through an end-to-end machine learning task using the Iris dataset. This comprehensive exercise will cover all stages of a machine learning pipeline, from data exploration to model deployment.
The Machine Learning Pipe-line
1. Introduction to the Dataset
The Iris dataset is a classic dataset in machine learning, widely used for benchmarking classification algorithms. It consists of measurements from 150 iris flowers, with four features- Sepal Length, Sepal Width, Petal Length, and Petal Width. Each sample is labeled with one of three species- Iris-setosa, Iris-versicolor, and Iris-virginica.
2. Objective
Our objective is to build a classification model that can accurately predict the species of an iris flower based on its measurements. We will explore the dataset, perform necessary preprocessing, and select an appropriate classification algorithm to achieve this goal.
3. Data Exploration and Preprocessing
- Exploratory Data Analysis (EDA): We will begin by analyzing the dataset to understand its structure and characteristics. This includes visualizing distributions, checking for missing values, and examining class balance.
Viewing the beggining Dataset: The code iris_df.head() displays the first five rows of the iris_df DataFrame, providing a quick overview of the dataset’s structure and the initial entries. We just visualize first 5 samples in the dataset as a table.
| sepal.length | sepal.width | petal.length | petal.width | variety | |
|---|---|---|---|---|---|
| 0 | 5.1 | 3.5 | 1.4 | 0.2 | Setosa |
| 1 | 4.9 | 3.0 | 1.4 | 0.2 | Setosa |
| 2 | 4.7 | 3.2 | 1.3 | 0.2 | Setosa |
| 3 | 4.6 | 3.1 | 1.5 | 0.2 | Setosa |
| 4 | 5.0 | 3.6 | 1.4 | 0.2 | Setosa |
3.a Data cleaning
- Data Cleaning: We will handle any missing values and ensure the data is ready for modeling. Basic preprocessing tasks will include feature scaling and normalization. Various steps in this stage is explained below.
Checking for Duplicates: The code iris_df.duplicated().sum() counts the number of duplicate rows in the iris_df DataFrame, helping identify any redundancy in the dataset that may need to be addressed.
np.int64(1)3.b Statistical Summary- Skewness, Kurtosis and Correlation
3.c Exploratory Data Analysis
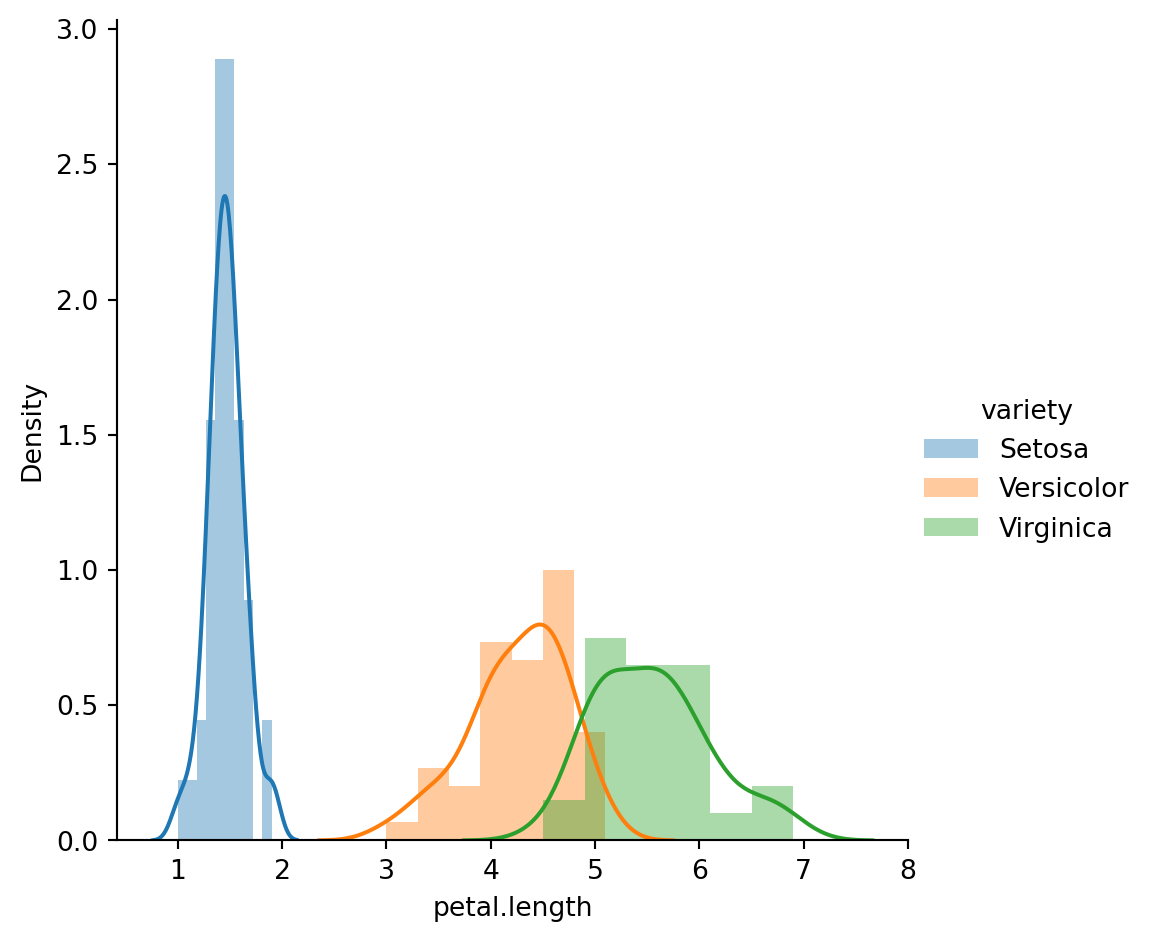
In this section we will perform various graphical analysis of features over the classes of target.
3.d Univariate Feature Analysis
3.e Statistical Feature Analysis
In this section various features are analysed in more detail. Presence of outlair and normality of feature distribution will be checked before ML model building.
4. Model Identification and Training
Based on our data exploration, we will select a suitable classification model. Based on the Exploratory Data Analysis (EDA), we found that petal.length and petal.width are the most influential features for determining the variety of the Iris flower. To classify the Iris dataset, several classification models can be employed. In this discussion, we will consider Logistic Regression, K-nn, Support Vector Machine, Decision Tree and Random Forest algorithms.
5. Model Selection
After training the model, we will evaluate its performance using various metrics such as accuracy and classification report. This will help us understand how well the model is performing and whether any improvements are needed. In this context, the RandomForestClassifier model is the winner. So we will select and save this model for deployment.
['rf_model.sav']6. Deployment
Finally, we will deploy our trained model using Streamlit, an open-source framework that allows us to create interactive web applications for real-time predictions. This will enable users to input flower measurements and receive predictions on the species.
To deploy the Random Forest Classifier model using Streamlit, we’ll need to set up several components for the complete workflow. Here’s a step-by-step guide to create the necessary files:
6.a Setting-up Streamlit
1. Prepare the Environment: In this step install the streamlit library using folowing code.
6.b Set-up source code for Model selection
2. Create the source code to load the trained model-model.py:
This .py file is used to load the trained model and handle predictions.
6.c Set-up source code for Prediction
3. Create prediction.py:
This .py file handles the prediction logic, using the loaded model to make predictions based on input data. The source code for this job is given below.
6.d Set-up source code for ML application
4. Creating the app.py:
This is the main Streamlit application file. It provides the user interface for inputting data and displaying predictions.
6.e Running the application in localhost
5. Run the Streamlit App:
Navigate to the directory containing your files and run the Streamlit app using the following command: